Awesome!
Please tell me about the caps on the transmission shift rails. I've never seen that before.
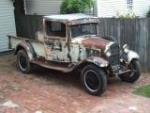
Truck progress photos
-
blgitn
- Posts: 201
- Joined: July 6th, 2013, 6:36 am
- Body Type: 275-A
- Model Year: 1931
- Location: West Point, VA 23181
Re: Truck progress photos
R/ Roger.
-
Jeff Brown
- Posts: 123
- Joined: May 26th, 2016, 9:57 am
- Body Type: 82-A
- Model Year: 1929
- Location: Tucson AZ
Re: Truck progress photos
Not my idea on the transmission caps, I saw it somewhere else that I can't remember, but it seemed a good idea. My shift shafts were OK but could definitely leak oil, so I counter bored the ends of the holes to fit a short length of copper pipe with an end cap over it. the pipe is just a good force fit with a smear of sealer around it.
Jeff
Jeff
-
Jeff Brown
- Posts: 123
- Joined: May 26th, 2016, 9:57 am
- Body Type: 82-A
- Model Year: 1929
- Location: Tucson AZ
Re: Truck progress photos
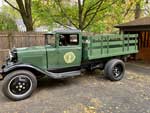
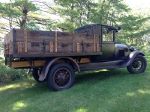
Well, the temperatures have cooled down a bit into the balmy nineties so I tackled the relocation of the rear support bracket for the Warford and shifted it so the flange is on the rear of the cross member as per posts above. Quite a mission and it has taken two full weekends but glad I did it as everything just fell into place nicely. Only issue was the rear of the driveshaft slid out of the splined sleeve coupling to the bevel gear driving the rear end so I had to take the drive shaft tube right out to get it back in. And here is the pic to prove it!
Now working on rebuilding all the cab floor members with my newly acquired MIG welder so hopefully full speed ahead from now on!
Jeff
- 20180826_095941e.jpg (646.33 KiB) Viewed 13597 times
Jeff
-
AAholic
- Posts: 281
- Joined: October 27th, 2010, 7:24 pm
- Body Type: 82-B
- Model Year: 1931
- Location: N.E.Illinois
Re: Truck progress photos
Thanks for the update, looks even more better, please post photos of your cab project, I'm on the verge of doing the same thing on mine
-
Jeff Brown
- Posts: 123
- Joined: May 26th, 2016, 9:57 am
- Body Type: 82-A
- Model Year: 1929
- Location: Tucson AZ
Re: Truck progress photos
Will do, only just working on the subrails at the moment and not entirely sure how all the bits fit together so maybe I can save you from making all my mistakes!
Jeff
Jeff
-
Jeff Brown
- Posts: 123
- Joined: May 26th, 2016, 9:57 am
- Body Type: 82-A
- Model Year: 1929
- Location: Tucson AZ
Re: Truck progress photos
Gradually getting bits of cab repaired ready for assembly. Probably like the majority of trucks, mine had a lot of corrosion around the seat and lower cab panels. The seat base had totally disintegrated and there was a lot of rust through on the subrails. Lower sections of the rear of the cab and corners had also disappeared. I attacked the subrails first mainly by cutting rusted pieces out and welding in new steel. Fortunately most of the corroded areas are hidden by the seat as I was learning to MIG weld with varying results!
I experimented in welding rusty patch panels to the lower cab panels but they looked awful as there was no way to match the rust patina along the welds. So instead of trying to hide the patches I decided to accentuate them by riveting them on and just adding some tack welds on the inside where they would not be seen. I had already tried this on one of my front fenders where there was a badly welded up tear and I liked the way it came out so now these match and they seem to be really strong. Not exactly original but I'd like to think it would be something a shade tree mechanic might do way out in the middle of nowhere.
For a long time I could not figure how the back of the cab attached to the rear cross member. Then I discovered that the center panel was shorter than the corner panels, which meant that it had to sit higher, which meant I had the rear angle upside down! After I righted that, everything seemed to fall into place and a lot more holes lined up where they should on a trial fit.
The new floor panel and seat base seem to fit quite well . I used the old repaired door frame brackets mounted on the new seat base and checked the alignment with the corner panels and wood door frame to make sure everything lined up.
I had to rework the mounting blocks a little to clear nuts and bolts as I bolted most of the floor frame together, only using rivets where they would be seen.
That's where I have got to, next is to do a trial fit of the floor on the frame to measure cutouts for the Warford and the 4 speed transmission, then clean off all the rust and give it the wax treatment.
Jeff
- 20180927_152759e.jpg (480.99 KiB) Viewed 13398 times
- 20180927_182320e.jpg (785.89 KiB) Viewed 13398 times
- 20180927_152640e.jpg (499.73 KiB) Viewed 13398 times
- 20180927_154104e.jpg (439.53 KiB) Viewed 13398 times
- 20180927_152521e.jpg (498.23 KiB) Viewed 13398 times
That's where I have got to, next is to do a trial fit of the floor on the frame to measure cutouts for the Warford and the 4 speed transmission, then clean off all the rust and give it the wax treatment.
Jeff
-
Jeff Brown
- Posts: 123
- Joined: May 26th, 2016, 9:57 am
- Body Type: 82-A
- Model Year: 1929
- Location: Tucson AZ
Re: Truck progress photos
And this is the photo of the upside down frame with the blocks in position - photo refused to load before!
Jeff
- 20180927_162922e.jpg (483.16 KiB) Viewed 13398 times
Re: Truck progress photos
I'm surprised you didn't put the top over the bottom to shed water? was there a reason you did it this way?
-
Jeff Brown
- Posts: 123
- Joined: May 26th, 2016, 9:57 am
- Body Type: 82-A
- Model Year: 1929
- Location: Tucson AZ
Re: Truck progress photos
Yes, the corrosion was really uneven from almost nothing to about 8" up so I would have had to cut some still good steel away to get a straight line. There is sealer between the two pieces and the rivets pulled it in really tight so I don't think it will leak - hopefully!
Jeff
Jeff
-
1crosscut
- Posts: 877
- Joined: December 25th, 2010, 7:22 pm
- Body Type: 82-A
- Model Year: 1929
- Location: Lincoln, NE
Re: Truck progress photos
Interesting fix that will generate a lot of conversation when you have it out and about. Your getting closer Jeff!
------------
Dave
Dave
-
Chris Haynes
- Posts: 2204
- Joined: September 7th, 2003, 5:18 pm
- Body Type: 82A
- Model Year: 1930
- Location: Camarillo, CA
Re: Truck progress photos
The Steam Punk crowd will like the rivets. The Model A people, not so much.
-
Jeff Brown
- Posts: 123
- Joined: May 26th, 2016, 9:57 am
- Body Type: 82-A
- Model Year: 1929
- Location: Tucson AZ
Re: Truck progress photos
I am sure you are correct Chris! One big problem with keeping the rust patina is doing repair work to panels so that it matches. And there is no way my truck is original as it has parts from all years in it so it will never look correct, no matter what. The important thing to me is I am having a lot of fun!
Jeff
Jeff
Re: Truck progress photos
any work on the fenders yet. it looks great what you have done.
-
Jeff Brown
- Posts: 123
- Joined: May 26th, 2016, 9:57 am
- Body Type: 82-A
- Model Year: 1929
- Location: Tucson AZ
Re: Truck progress photos
No, not yet, still trying to decide on the best way to attack them!
Jeff
Jeff
-
Jeff Brown
- Posts: 123
- Joined: May 26th, 2016, 9:57 am
- Body Type: 82-A
- Model Year: 1929
- Location: Tucson AZ
Re: Truck progress photos
It's been an exciting few weeks finally getting my cab put together. Generally it has gone together pretty well with only minimal pushing and pulling to get bolt holes to line up. I was really surprised how rigid the back of the cab became once the seat braces went in. The hardest part was getting the front doorposts, cowl and gas tank all joined together. The cowl and tank were not original as they had terminal rust. One thing I learnt to my cost was that the rail across the top of the tank under the windscreen cannot go in after the tank is bolted up! So that meant taking all the clips and bolts off to spread the doorposts enough to squeeze it in. I think they were originally riveted to the doorposts but mine wasn't.
Next up is to finish work on the headlights and horn and then get the wiring done so I can try starting her up.
Jeff.
- 20181027_144305e.jpg (510.32 KiB) Viewed 13000 times
Jeff.